A green screen (or blue screen) is used to extract an element from a background for composting into another image. An algorithm replaces the background with transparency and thereby isolates the foreground element.
Any color can be selected, but green is the best choice for electronic cameras.
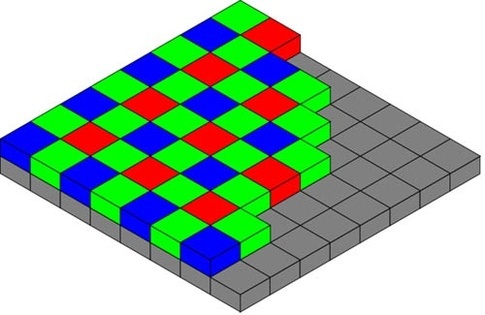
Electronic sensors have red, green and blue photo sites (RGB) to create an image.
In most sensors, there are twice the number of green photo sites as red and blue.
This means the green channel has more spatial and intensity precision. Which is why green-screens are favored for keying images. It gives the most accurate key.
Let's recap; Chroma key is the technology used to create a different background for a video. A common example of chroma key is that of the TV weatherman.
The TV weatherman is taped with the weatherman standing in front of a blue or green screen. A weather map is then substituted for the blue or green background. In order to accomplish this feature, you will most definitely need a blue or green background, a video camcorder, and a computer with plenty of memory and hard drive space. You also need chroma key software such as Adobe's Ultra CS3 or Adobe's Premiere Pro. Once you have these, just work carefully through the steps.
The first thing you need to do is to set up your filming area with adequate lightning for your camcorder. If you don't have a large room, your garage will do nicely.
Next, arrange lightning with three lights. You want to light the blue or green background evenly with your lights set at a 45-degree angle from the screen. The lights should be far enough back so they don't cause hot spots.
Next, make sure that your subject or talent, as the individual is called, is a minimum of three feet from the screen. Your talent should be lit by the third light in such a manner so there is no shadow cast upon the background.
Next, position your camcorder far enough from the talent to attain the desired view: a full-body shot, a half-body shot or a seated shot, of the talent.
Next, film ten seconds or more of your blue/green background without the talent in the frame. This will be used to get a "clean" key with the software later.
Next, move your talent into the desired position and start shooting. If you are going to use live audio, have a good lavaliere microphone attached to the talent's clothing, far enough away from the talent so that breathing is not captured on mic.
Next, begin shooting your video! Make sure to shoot a few seconds past where you will end in editing.
Next, after you have captured the video onto your camcorder, connect your camcorder to your PC via a fire-wire connection. Note: A DVD camcorder must have the video transferred to the hard drive in another manner.
Next, switch your camcorder to VTR or VCR mode.
Next, launch your software.
Next, advance your film clip into the area where you have the blue/green screen without the talent. Ultra allows you to auto key or manually key. Generally, with adequate lighting, auto key works fine.
Next, select the static background scene or virtual set you would like your talent viewed in. On TV, they are using the weather maps as the background coming from the PC.
Next, select the compression or Codec you will be using. This is done because video coming from a camcorder will create a large file. A rough rule of thumb is that ten minutes of video equates to 2gb of hard drive space. The Codec (compress-decompress) used will reduce the size of the file depending on the Codec used. Be aware, there is no free lunch. When you compress, you are leaving something out so your quality is being reduced, though there are loss-less codec's available.
Next, select the output format you would like to use, like the .avi format as it is acceptable to most replay software.
Next, allow software to render the video. This could take some time depending on the length of the video and the speed of your computer and the resolution you have selected.
Next, save the output, and you are finished!!
You can then take the finished video to an editor such as Pinnacle Studio, Adobe Premiere, or Premiere Elements. You could also use Microsoft Movie-maker that is part of windows but it's fairly basic in its capabilities. In the editor, you can delete or rearrange the scenes as you see fit. You can also add background audio as well, as well as titles and credits. Special effects software is also available that will let your create such things as lightning, explosions, and other special effects.
Know that Chroma key allows your imagination to run rampant. In one afternoon, you can tape yourself in front of the Sphinx. The Taj Mahal and a beach in the south of France, all without leaving your 10' X 12' computer room.
Any color can be selected, but green is the best choice for electronic cameras.
Electronic sensors have red, green and blue photo sites (RGB) to create an image.
In most sensors, there are twice the number of green photo sites as red and blue.
This means the green channel has more spatial and intensity precision. Which is why green-screens are favored for keying images. It gives the most accurate key.
Let's recap; Chroma key is the technology used to create a different background for a video. A common example of chroma key is that of the TV weatherman.
The TV weatherman is taped with the weatherman standing in front of a blue or green screen. A weather map is then substituted for the blue or green background. In order to accomplish this feature, you will most definitely need a blue or green background, a video camcorder, and a computer with plenty of memory and hard drive space. You also need chroma key software such as Adobe's Ultra CS3 or Adobe's Premiere Pro. Once you have these, just work carefully through the steps.
The first thing you need to do is to set up your filming area with adequate lightning for your camcorder. If you don't have a large room, your garage will do nicely.
Next, arrange lightning with three lights. You want to light the blue or green background evenly with your lights set at a 45-degree angle from the screen. The lights should be far enough back so they don't cause hot spots.
Next, make sure that your subject or talent, as the individual is called, is a minimum of three feet from the screen. Your talent should be lit by the third light in such a manner so there is no shadow cast upon the background.
Next, position your camcorder far enough from the talent to attain the desired view: a full-body shot, a half-body shot or a seated shot, of the talent.
Next, film ten seconds or more of your blue/green background without the talent in the frame. This will be used to get a "clean" key with the software later.
Next, move your talent into the desired position and start shooting. If you are going to use live audio, have a good lavaliere microphone attached to the talent's clothing, far enough away from the talent so that breathing is not captured on mic.
Next, begin shooting your video! Make sure to shoot a few seconds past where you will end in editing.
Next, after you have captured the video onto your camcorder, connect your camcorder to your PC via a fire-wire connection. Note: A DVD camcorder must have the video transferred to the hard drive in another manner.
Next, switch your camcorder to VTR or VCR mode.
Next, launch your software.
Next, advance your film clip into the area where you have the blue/green screen without the talent. Ultra allows you to auto key or manually key. Generally, with adequate lighting, auto key works fine.
Next, select the static background scene or virtual set you would like your talent viewed in. On TV, they are using the weather maps as the background coming from the PC.
Next, select the compression or Codec you will be using. This is done because video coming from a camcorder will create a large file. A rough rule of thumb is that ten minutes of video equates to 2gb of hard drive space. The Codec (compress-decompress) used will reduce the size of the file depending on the Codec used. Be aware, there is no free lunch. When you compress, you are leaving something out so your quality is being reduced, though there are loss-less codec's available.
Next, select the output format you would like to use, like the .avi format as it is acceptable to most replay software.
Next, allow software to render the video. This could take some time depending on the length of the video and the speed of your computer and the resolution you have selected.
Next, save the output, and you are finished!!
You can then take the finished video to an editor such as Pinnacle Studio, Adobe Premiere, or Premiere Elements. You could also use Microsoft Movie-maker that is part of windows but it's fairly basic in its capabilities. In the editor, you can delete or rearrange the scenes as you see fit. You can also add background audio as well, as well as titles and credits. Special effects software is also available that will let your create such things as lightning, explosions, and other special effects.
Know that Chroma key allows your imagination to run rampant. In one afternoon, you can tape yourself in front of the Sphinx. The Taj Mahal and a beach in the south of France, all without leaving your 10' X 12' computer room.
